
These are quick and easy to make. Attach the finished angels to the tree by the clothespin itself or sew a ribbon hanger to the back of the angel. These can also be used as bowl ornies or garland decorations!

Supplies
Push Clothespins
White fabric
Gold or silver strung beads
Gold or silver 1/8” ribbon (3mm)
Glue gun and glue sticks
Needle & white thread
Optional: Spray adhesive & clear glitter
Instructions
1. Cut gown fabric 3” L x 7 ½” W. Glue or sew 7 ½” length of ribbon to bottom of gown. Sew ends together using ¼” seam allowance so you have a finished piece 3” L x 3 ½” W.

2. For wings, cut fabric 10” L x 3” W. Sew ends using ¼” seam allowance so you have a finished piece 4 ¼” L x 3” W.

Back seams of skirt and wings
3. With seam centered, turn raw edges under ¼” and sew the edges together.
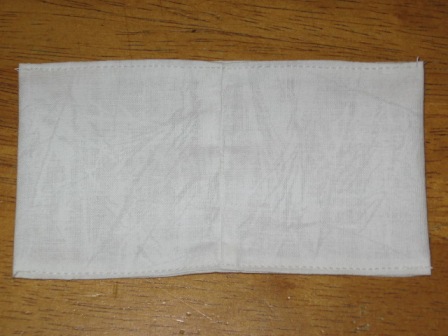
Sew top and bottom of wing edges
4. Gather center of the wings. Then wrap thread around the gather a few times to hold. Tie off thread in the back.

5. If adding sparkle, spray adhesive onto wings and gown. Sprinkle glitter over both. Allow to dry completely (this may take up to 24 hours).

6. Cut beads to length so to fit the angel’s “head”. Glue in place to resemble a halo.


7. Place gathering stitch around neckline. Place gown onto clothespin angel and gather neckline. Tie a 12” length of ribbon around the “neck”. It may be necessary to add a dab of hot glue in spots to hold ribbon. Cut off excess ends.

Gather neckline

Tie ribbon around neck
8. Glue wings – centered - onto back of angel (seam facing the clothespin).

9. Now you can add to tree, garland, wreath or bowl.
Feel free to make these angels for fun or for profit using this pattern. Email us at the email address above if you have any questions. Please give designer credit to Sew Practical. (c) 2008 All rights reserved.
No comments:
Post a Comment